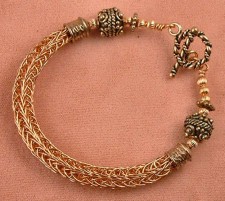
Making a viking knit bracelet is pretty easy, once you’ve got a handle on the directions for viking knit. Now that you’ve got that more or less mastered, a bracelet is a good first project.

But before we get to making that bracelet, let’s talk a minute about the wire you’ll be using for your viking knit.
Viking Knit Wire Gauge
There are two gauges of wire commonly used with viking knit — gauges 24 and 26. Occasionally gauges 22 and 28 are used, but they are a little more difficult to deal with, at least at first.
(If you need it, here’s a refresher on wire for jewelry making.)
What Kind of Wire for a Bracelet?
If you’re just starting out, I suggest copper wire in 24 gauge. It’s inexpensive, easy to find and makes a very pretty viking knit bracelet in either single or double knit.
My next suggestion would be brass wire. It’s a little stiffer to manipulate than copper, but still makes for a nice piece of jewelry.
My third suggestion for just starting out would be one of the colored artistic wires — basically enamel coated copper. Why is this my 3rd choice?
The artistic wire can scratch very easily in the course of making the viking knit chain. If the color is light and shiny, the scratches might not be very apparent. But for a darker color, you will eventually notice the wearing away of the colored coating.
So if you go the artistic wire route, choose a bright shiny (metallic-looking) color and you will probably be OK. And after I said all that, I do use artistic wire for seasonal jewelry (red and green for Christmas, metallic pastels for Spring, etc.). I just don’t use it for bracelets I plan to wear day in, day out.
(FYI, I’ll be testing a new kind of colored wire in the near future; I’ll let you know how that fares, if it’s any better.)
Naturally, you can use silver (fine, sterling, argentium) or gold (karat or gold-filled) wire; they make beautiful bracelets! But they are best reserved for when you are more experienced.
That takes care of the wire you’ll need for your bracelet. Stay tuned for the draw plate information!
[…] Knit Gallery « Sculptural Peyote Bracelet Making a Viking Knit Bracelet – The Wire […]
Hi I am interested in your Viking Knit E book to polish my work. I know how to do Viking knit using a spool. It has five prongs. I have made a few chains but they do not come out neat and clean. I’d like to see it more uniform. May be with practice it will, but is there any thing I am missing? that I want to get from your book.
If you use other kind of tool to make the chain/bracelet other than the five prong spool please let me know.
Please leave the reply as a comment in my blog- http://www.alankarshilpa.blogpost.com also I’ll check here in your blog in a few days. Thank you. Dita
Hi Dita,
I suspect that it is the 5-prong spool that is causing your difficulties — I used it once and didn’t like the results. (However, I know others have used it successfully.) I have been using a dowel ever since, which is what I teach. For me at least, the dowel helps to control the tension, as well as look at the chain as it is forming — that way if I see a mistake, I can fix it quickly. Plus, with a dowel, I can use as many petals as I want, and am not restricted to 5.
I’ll leave a comment on your blog as well, but I wanted to put an answer here as well so as to assist others who may have the same question.
Thank you so much. Dita.